Posts

Showing posts with the label hairstyles

Hair Tutorial/ /Balay-Sun Ray

Image
The easiest way to curl thick and long hair is to put in a high pony-tail and curl the ends! I obviously had way too much fun taking angles of these beautiful curls.  ♡Anna Products I used on this gal

Hair Tutorial/ /Holiday Hairstyle

Image
Here is one of my holiday updos!  Dutch braids wrapped loosely around her bottom and a cute volumized middle parting, finished off with a delicate little bow on top! ♡Anna         

Hair Tutorial/ /Dance Hair

Image
I got the privilege to do some dance hairstyles! For the first style, we chose to do an updo with a side braid sweeping back towards the bun. To keep it balanced, I added a small twisted braid on the opposite side.  The last style was simply curly. ♡Anna

Hair Tutorial/ /Dutch braided pigtail buns

Image
Dutch braids are the opposite of a french braid. Instead of taking the strands over, like you would normally do in a french braid, you take the strands under the middle strand as you braid. It's hard to explain, but there are countless Youtube videos to help! And of course the best thing you can do is practice.     Here you can see I gathered the pigtails together into a bun at the base of her neck. Which ended up really elegant looking. Hope you liked the hairstyle! ♡ Anna

Hair Tutorial/ /Fishtail Bubble Braid

Image
The fishtail is classic for looking like a mermaid braid. The bubble fishtail braid looks even more like something from under water! When doing the normal fishtail braid you simply take a section of hair and divide it into two. Giving parts of each section repeatedly creates the traditional fishtail braid. However, to do the bubble fishtail braid you'll stop after 6 or 7 "trade-offs" and end it with an elastic to divide the braid and make it look like bubbles!  Here are the tools I used to create this look: ♡Anna

Reverse Balayage with Low-Lights

Image
My lovely nana came in for a root touchup but wanted it to be drawn down some to look almost like a balayage.  So I decided to give her a reverse balayage while covering her roots.  I absolutely loved the turnout! ♡Anna Interested in getting this done?

Hair Tutorial/ /How to Build a Braided Bun

Image
This updo is possibly my most favorite. Super easy and simple to do. Gives a touch of elegance and fun.  How I did it All right, so what you're going to do first is section the pieces framing the face away from the rest of the hair. Then section another area starting 4 inches from the nape of the neck, (this is going to be your base). The crown will be put in an elastic after being volumized (teased). Braid your base section with a braid of your choice, I chose to do a dutch braid. Wrap the braid and the strands coming from your elastic into a bun by twirling it in circles and then pinning it into place with bobby pins. Determine what your desired look will be and style the pieces framing the face by draping them towards the back and pinning them. I chose to do a simple rope braid for this look and left out a few little strands to curl.  What I used ♡Anna

Hair Tutorial/ /Loose Spirals

Image
My hair tends to be a little indecisive. Some days I can blow dry it and it looked as if I straightened it, on others I can let it air dry and it'll be curly ringlets. I guess that's what you'd call a neutral head, maybe? I'm neither naturally straight, nor am I curly. I'm sort of in-between. The good thing about my hair-type is any look can hold for long periods of time. Which comes in handy when I want loose tousled waves, like these.  Products I used:  Hottools™ 1" curling iron Kenra™  Volume Spray Super Hold Finishing Spray n.25 OGX™ Argan Oil

Independence Day 2017

Image
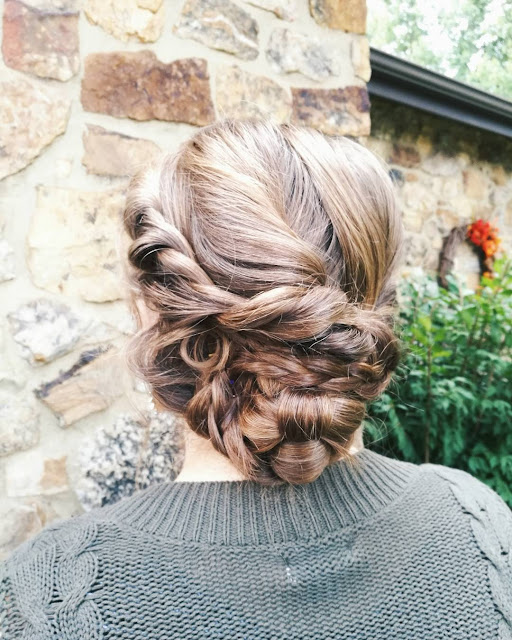
This year my sister and I wanted to do a little something different with our festive nails. Instead of the iconic firework based nail art, we decided to use red-white-and-blue themed floral designs. I think it turned out adorable! Plus you can even work the look after the 4th of July! I couldn't exclude a new hairstyle! I'm calling this one the messiest, twisted updo ever. My sister requested something out of her face and off her shoulders, so I did just that.  "Now the Lord is the Spirit; and where the Spirit of the Lord is, there is liberty." ( II Corinthians 3:17 ) I hope you and your family/friends have a blessed Independence Day! ♡ Anna

Hair Tutorial/ /Double Dutch Infinity braid

Image
One of the things I love most is trying out new trends and expanding my knowledge of braids. I came across several different looks with this iconic 'infinity braid' and I was eager to try it! Here's the video that helped me the most.   You can either complete the braid by doing a simple pony at the nape of your neck or finish it with a braid of your choice. I decided to blend it in by using a fishtail technique.  Hope you like it! ♡ Anna

Hair Tutorial/ /The Top Knot

Image
The top knot has become a popular look.  Here are a few tips and tricks to help you create the perfect top knot look! Only grab the very top crown pieces of hair for your knot. If desired, you can tease those pieces for them to looks bigger.  When you wrap it up, twist your hair and pull it through an elastic. Leave a little bit out to create the knot effect.  Pull the edges to make it 'fluffier.'  For a more precise and clean look, you can take the stray pieces of the bun and bobby pin them into the bun.   Don't forget hairspray ! This look is everything that Summer represents; relaxing, simple, effortless, fun, and messy.  ♡ Anna

Hair Tutorial/ /Volumizing Curls

Image
My sister and I were creating pathways through our local college campus while waiting for our mom to finish her photoshoot. Buying time and, as you can see, fancy caffeinated drinks, we had a mini-photoshoot of our own. The tools I used for this look were: Tresemme Thermal Heat Protectant NuMe Classic 19mm Curling Wand Sexy Hair Volumizing Hair Spray ♡ Anna

Hair Tutorial/ /Inverted Pigtails

Image
This look was inspired by one of my favorite Hairstylists, Kayley Melissa . Her hair and everything she does with it is always flawless.  After seeing the following video I had to try it out. I hope you gain motivation to do the same! ♡ Anna

Hair Tutorial/ /Twisted Double Updo

Image
Tried this on my sister and it actually turned out okay. At first, I was a bit afraid she'd look like a distorted Princess Lei in the end, but it turns out she worked it. I'm going to try to describe how I managed this hairstyle. Perhaps in the future, there will be video tutorials? But this will have to do, for now anyway. Begin with already textured hair. I find it's much easier to work with whenever you choose to do an updo, especially buns. My sister's hair is already naturally curly/wavy so all we did beforehand was add some plump moisturizing mouse. Section off the hair after you find your parting. Leave two parts closer to the front of your face out- you'll use those pieces to twist back into the buns. Divide the hair in the back into two horizontal parts. Create your buns by twisting the gathered hair and capture it with an elastic. Do the same with the other half. To mix it up, I twisted them both in opposite directions, that way they would ...

Hair Tutorial/ /Messy Beach Curls

Image
To achieve this look I used my 25 mm curling wand along with some of my favorite texture spray. The trick to gaining those effortless beachy waves/curls is to leave about an inch of hair uncurled at the ends. Also, once you've curled a strand of hair remember to stretch it afterward! Which allows the curls to release into a relaxed and wavy look. This is one of my favorite looks to create! It brings out the natural, beautiful, and voluminous highlights in any hairstyle. ♡ Anna

Hair Tutorial/ /Emma Hair

Image
As you can see this hairstyle expresses quite a bit of volume, as well as curls. Not only is this updo elegant and voluminous, it has an essence of historical beauty. If I'm not braiding or reading, you'll most likely find me watching BBC adaptions of Jane Austen's classics, such as  Pride & Prejudice ,  Sense & Sensibility , and my personal favorite,  Emma . The character that is portrayed in the miniseries is by far the perfect portrait of who I imagined Emma to look like. Especially the hair. Her effortless curls and perfect updos are some of the most beautiful looks. This weekend I attempted to recreate one of them. To achieve this 'Emma' hairstyle you will want, to begin with freshly washed and blown-dry hair. If you already have two-day texture, it should work fine. Although, you might wish to add some dry shampoo to increase the level of volume. I used my NuMe 32mm curling wand  for these slight curly/waves. ...

Hair Tutorial/ /A Simple Mermaid Braid

Image
Floating in the pool all day gives a perfectly good excuse to braid hair. Not only do you get the wavy texture later, but also the adorable fishtail! My friend let me practice on her beautiful hair — which reminds me of the Disney princess, Ariel — so obviously I had to give her the fish look. ♡ Anna